

Puedes ver todos los tutoriales del Juego de la vida aquí: Tutoriales Juego de la vida.
En este tutorial realizaremos un pequeño homenaje a John Horton Conway desarrollando su famoso juego de la vida con Vue, typescript e incluyendo algunos toques de neomorfismo.
Índice de contenidos
- 1. Introducción
- 2. Entorno
- 3. Reglas del juego
- 4. Empezamos el juego
- 5. Estilos
- 6. Código
- 7. Resultado final
- 8. Referencias
1. Introducción
El Juego de la vida es un sencillo juego con unas reglas muy simples en el cual nadie gana ni pierde.
La primera aparición del juego fue en 1970 en la revista Scientific American.
Para saber más acerca de la historia del juego puedes consultar la wikipedia.
2. Entorno
El tutorial está escrito usando el siguiente entorno:
- Hardware: Portátil MacBook Pro 15′ (2,7 Ghz Intel Core i7, 16GB DDR3).
- Sistema Operativo: Mac OS Catalina 10.15.3
- Entorno de desarrollo: Visual Studio Code
- Framework: Vue
- Lenguaje de programación: Typescript
3. Reglas del juego
Regla número 1: Para que una célula siga viva, esta debe tener 2 ó 3 vecinos vivos. Si tiene más muere debido a la superpoblación, si tiene menos entonces muere debido a la soledad.
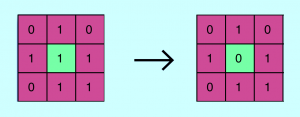
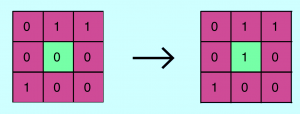
Regla número 2: Si una célula muerta tiene exactamente 3 vecinas vivas revive.
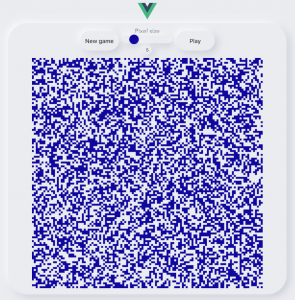
4. Empezamos el juego
El primer paso a realizar es crear nuestra interfaz, utilizaremos un panel canvas, tres botones y un slider para poder elegir el tamaño de los pixeles.
<template>
  <div class="container">
    <v-container>
      <div class="buttons-container">
        <button @click="newGame()">New game</button>
        <div class="slider-container">
          <span>Pixel size</span>
          <input
            type="range"
            min="4"
            max="10"
            value="4"
            class="slider"
            id="myRange"
            v-model="pixelSize"
            @click="newGame()"
          />
          <input class="size" type="text" name="size" id="sizing" v-model="pixelSize" />
        </div>
        <button @click="play()" v-if="interval === null">Play</button>
        <button @click="pause()" v-else>Pause</button>
      </div>
      <div>
        <canvas :height="600" :width="600"></canvas>
      </div>
    </v-container>
  </div>
</template>
5. Estilos
Ahora le damos unos toques de neomorfismo a los botones, slider y contenedor donde estará el canvas.
<style lang="scss">
.container {
  border: 0;
  outline: 0;
  display: flex;
  justify-content: center;
  margin: 0px 350px;
  padding: 10px;
  border-radius: 50px;
  background: var(--primary-color);
  box-shadow: -5px -5px 20px var(--white-color),
    5px 5px 20px var(--secondary-color);
  box-sizing: border-box;
}

.buttons-container {
  display: flex;
  justify-content: center;
  margin-bottom: 10px;
}

button {
  border: 0;
  outline: 0;
  border-radius: 200px;
  padding: 10px;
  margin: 10px;
  width: 100px;
  font-size: 15px;
  background-color: var(--primary-color);
  font-weight: bold;
  box-shadow: -5px -5px 20px var(--white-color),
    5px 5px 20px var(--secondary-color);
  transition: all 0.2s ease-in-out;
  cursor: pointer;
  font-weight: 500;

  &:hover {
    box-shadow: inset -2px -2px 5px var(--white-color),
      inset 2px 2px 5px var(--secondary-color);
  }

  &:active {
    box-shadow: inset 1px 1px 2px var(--secondary-color),
      inset -1px -1px 2px var(--white-color);
  }
}

.slider-container {
  width: min-content;
}

.slider {
  -webkit-appearance: none;
  margin: auto;
  height: 20px;
  background: var(--primary-color);
  outline: 0;
  border-radius: 200px;
  box-shadow: -5px -5px 20px var(--white-color),
    5px 5px 20px var(--secondary-color);

  &:hover {
    box-shadow: inset -2px -2px 5px var(--white-color),
      inset 2px 2px 5px var(--secondary-color);
  }
  &::-webkit-slider-thumb {
    -webkit-appearance: none;
    appearance: none;
    border-radius: 50%;
    width: 25px;
    height: 25px;
    background: var(--tertiary-color);
    cursor: pointer;
  }
  &::-moz-range-thumb {
    width: 25px;
    height: 25px;
    border-radius: 50%;
    background: var(--tertiary-color);
    cursor: pointer;
  }
}

.size {
  border: 0;
  outline: 0;
  width: 12px;
  padding: 5px;
  text-align: center;
  background-color: var(--primary-color);
  border-radius: 40px;
  box-shadow: -5px -5px 20px var(--white-color),
    5px 5px 20px var(--secondary-color);
}
</style>
6. Código
Primero definimos las variables que usaremos.
data() {
    const pixelSize = 4;
    const side = Math.min(window.innerWidth, window.innerHeight);
    const height = Math.min(Math.floor((side - 100) / pixelSize), 175);
    const width = Math.min(Math.floor((side - 100) / pixelSize), 175);
    const state = "0".repeat(height * width);
    return {
      counter: 0,
      color: "#10069F",
      height: height,
      velocity: 100,
      interval: null,
      pixelSize: pixelSize,
      state: state,
      width: width
    };
  }
Después creamos los métodos que nos llenarán aleatoriamente el panel de células vivas y muertas. Con esto partimos con un panel diferente en cada nuevo juego.
    newGame() {
      if (this.interval !== null) {
        this.pause();
      }
      let state = "";
      while (state.length !== this.height * this.width) {
        state += Math.floor(Math.random() * 2).toString();
      }
      this.state = state;
      this.draw();
    },
    draw() {
      const context = this.$el.querySelector("canvas").getContext("2d");
      let counter = 0;
      context.clearRect(
        0,
        0,
        this.width * this.pixelSize,
        this.height * this.pixelSize
      );
      context.fillStyle = this.color;
      while (this.state !== 0 && counter < this.width * this.height) {
        const x = counter % this.width;
        const y = Math.floor(counter / this.width);
        if (this.state[counter] === "1") {
          context.fillRect(
            x * this.pixelSize,
            y * this.pixelSize,
            this.pixelSize,
            this.pixelSize
          );
        }
        counter++;
      }
    }
Ahora necesitaremos saber si los vecinos de cada célula están vivos o muertos y así poder determinar el estado de la célula.
    neighbors(position) {
      let north = position - this.width;
      if (north < 0) {
        north = north + this.height * this.width;
      }
      let northeast = north + 1;
      if (northeast % this.width === 0) {
        northeast = northeast - this.width;
      }
      let northwest = north - 1;
      if (northwest < 0 || northwest % this.width === this.width - 1) {
        northwest = northwest + this.width;
      }
      let east = position + 1;
      if (east % this.width === 0) {
        east = east - this.width;
      }
      let west = position - 1;
      if (west < 0 || west % this.width === this.width - 1) {
        west = west + this.width;
      }
      let south = position + this.width;
      if (south > this.width * this.height) {
        south = south - this.width * this.height;
      }
      let southeast = south + 1;
      if (southeast % this.width === 0) {
        southeast = southeast - this.width;
      }
      let southwest = south - 1;
      if (southwest < 0 || southwest % this.width === this.width - 1) {
        southwest = southwest + this.width;
      }
      return [
        north,
        northeast,
        east,
        southeast,
        south,
        southwest,
        west,
        northwest
      ];
    }
Ahora necesitaremos un método que nos ayude en cada iteración para repintar el panel.
    nextIteration(state) {
      let counter = 0;
      let newState = "";
      while (counter < this.width * this.height) {
        const livingNeighbors = this.neighbors(counter).reduce(
          (alive, neighborsPosition) =>
            alive + parseInt(state[neighborsPosition]),
          0
        );
        if (
          state[counter] === "1" &&
          (livingNeighbors === 2 || livingNeighbors === 3)
        ) {
          newState += "1";
        } else if (state[counter] === "0" && livingNeighbors === 3) {
          newState += "1";
        } else {
          newState += "0";
        }
        counter++;
      }
      return newState;
    }
Y ahora haremos los métodos encargados de pausar el juego y de empezarlo.
    pause() {
      clearInterval(this.interval);
      this.interval = null;
    },
    play() {
      this.interval = setInterval(() => {
        this.draw();
        this.state = this.nextIteration(this.state);
        this.counter++;
      }, this.velocity);
    }
7. Resultado final
Como resultado final tendremos un juego de la vida con esta apariencia.
8. Referencias
Podéis ver todos los tutoriales sobre el juego de la vida en https://www.adictosaltrabajo.com/2020/04/30/el-juego-de-la-vida-de-conway/

